Friday, November 21, 2014

DIY solutions for everyday problems: home organization

I'm not a statistician, but I'm sure we all waste a few days per year in solving annoying everyday problems, such as tangled cords, dresses that slip from their hangers, earrings that get lost... This is why today I came with some solutions for tidy DIYers. Unfortunately I'm not one of that kind, that's why I searched for the best DIYs made by organization lovers. I'm more like playing with chaos, what could I do? However, I promise I'm going to give a try to some of these projects. At least I have an intention!!
 If your hangers don't have a small notch on the sides, to prevent your dresses from falling, just try this idea by In My Own Style: wrap some pipe cleaners around your hangers. Problem solved!
If your scarfs and your coat always end up somewhere on the living room, when you arrive home... Why don't you try building a beautiful coat stand like this one made by Cantilever and Press?
 This is one of the things that my followers have asked me to do several times: how to make an organizer for accessories. You guys can put a frame in your bedroom, with some padding inside, that allows you to hang your earrings and necklaces. However, I don't really like these solutions as a decorating element. But I do recognize they're so useful, so I would definitely put them on the inner side of my closet's door.

Life is what happens while your are busy untangling your cords... I really need one of these, because I literelly live surrounded by cables. I recommend you visiting Organize your Stuff Now and I heart Organizing, two must-visit blogs for messy people with good intentions.

Thursday, November 13, 2014

DIY Inspiration: How to customize your leather jacket


Today's edit has been inspired by some requests made by my YouTube subscribers: some of them asked me for ideas to upgrade or to recycle an old perfecto leather jacket. I personally believe that a well customized leather jacket can easily become an outstanding piece on our wardrobes. The only thing that keeps me away from getting started with such a brave DIY project is that... I really love my leather jacket. I love it just the way it is, I don't want to add any embellishments nor to change its design. However, I'll try to find an inexpensive leather jacket during the sales season in order to create a tutorial for you.

This DIY inspiration is not something I'm going to recreate by now, but I know that many of you have old jackets that need urgently some sort of makeover to make them wearable again. So I hope you guys like these ideas!

xxx


Monday, July 7, 2014

DIY Inspiration: Summer tableware


Lee esto en Español
Having dinner outdoors is probably one of the best things we can do during the summer. I always yearn for those moments during the rest of the year. Our closest friends and a table, there's nothing else we could need. Well, that's not 100% truth, we obviously need plates and cups!! In today's post I came up with a selection of colorful chinas and glasswares, most of them are hand-painted. Some of these tables could instantly raise your positive energy (something we should save and keep for when it gets chilly). Hope you guys like it!


Compártelo en tus redes sociales ¡gracias por tu apoyo!
Compartir en Topic

Wednesday, April 2, 2014

DIY: How to make a leather bag in 10 minutes!! The easiest bag EVER!!!


Hello my dear DIYers!

Last weekend I had the chance of 
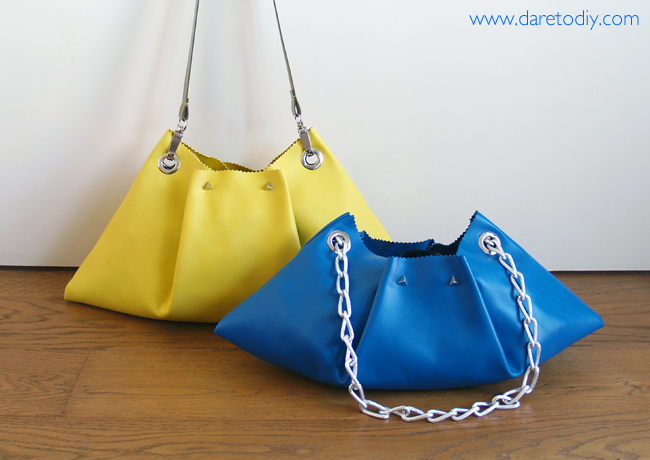
travelling to Madrid to hold two conferences about my experience as a DIY fashion blogger. I ended my speech with a DIY in live so the assistants could see how I make my projects in person. As I didn't have much time, I had to do something quick yet stunning. I obviously had to refuse using any staining materials such as glue, paint etc. So this is what I came up with! A bag you can easily make in 10 minutes that doesn't need much sewing!

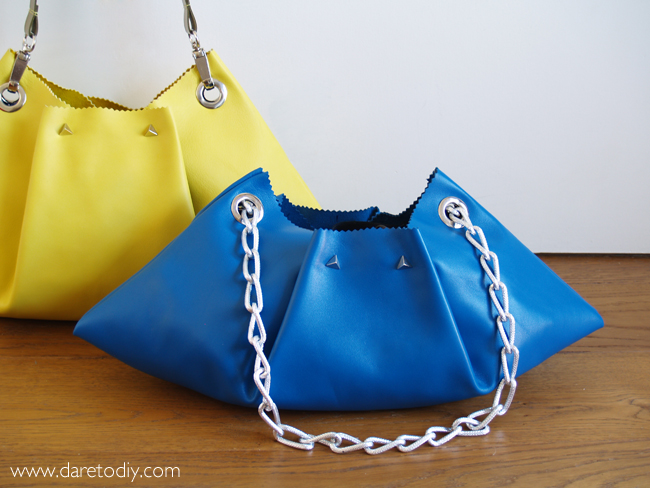
The pattern of this bag is just a rectangle, I folded it in half and sewed the sides. To hold the pleats on the center I used four pyramid screw studs. And to place the strap I put 4 manual eyelets, they work like regular studs, no riveting machine required. All these supplies make everything much easier... Even if you don't have a sewing machine, you could still hand-sew the sides of the bag. 

Hope you guys enjoy the video! As you know it's in Spanish, but I'm seriously thinking of starting a new channel in English. Let me know if you guys are interested!! Meanwhile, if there's anything you don't understand or you don't see clearly on the images, just ask and I'll be pleased to answer!!


The best part of this DIY is that, despite I'm using high quality materials, such as genuine leather, it's really inexpensive. I got the yellow leather piece for 10 euros (it was on sale) and all the hardware for 9 euros more. In the end it was 19 €!! However, having a bag you really like, made by you, is really priceless. 

SUPPLIES
Leather: As we don't have to sew so much, and we are not going to sew several layers of leather, I recommend using thick leather. Your bag will look much better. If you go for a thin leather, you can add some fusing to harden it a little bit. If you do that, you'll also have to add a facing and a lining. 

Manual Eyelets: They provide a professional look, they're super easy to use and don't require any expensive riveting machine.

Screw Studs: They're so useful because they let us make strong joints really easily. They're available in a wide range of shapes and colors.

Carabiners

Faux leather strap: I'm using a faux leather strap because its much easier to sew. Real leather straps for bags are so thick they usually require a professional riveting machine.

Chain: Make sure your chain isn't so big for the eyelets. You can also dress the chain up with some ribbon, here's an example.


What do you guys think? Do you dare to make this DIY?
xxx

Sylvia

Tuesday, February 4, 2014

DIY Decor: Office Makeover

Hi everyone!!
Last Sunday some of you guys saw me on Instagram drawing on a wall. Yes I know that sounds weird ;) I couldn't wait to show you the final result!!

So here's how this crazy project started: A few weeks ago, the guys from Crows & Dogs asked to give them a hand in their office decoration. They're a young (and amazingly talented) group of entrepreneurs who created their own creative digital agency a year ago in Barcelona. Since then, they've launched super cool projects such as Topic, a social network in which you can follow the subjects you like instead of following people. 

They are struggling to raise their company, so everything had to be DIY and low cost. We had to use our inventiveness! You don't have everyday the chance of doing something different and creative (nor you have a blank wall to paint whatever you like). So I instantly said yes!! The process was exhausting, but I had so much fun. ¡Hope you guys enjoy the video!


Previous draft of our virtual kitchen =D
For the meeting room we decided to wallpaper the main wall (the one you see from the door, that makes the first impression) with international newspaper sheets. We used wallpapering glue and applied a few layers of paper. As we combined different sizes, languages and directions, we got a very interesting effect. On the next wall we painted some fake frames to keep up with the idea of the trompe l'oeil we did in the kitchen. However, the frames are still in process. We'd like to fill them up to get something similar to this. But it will take time...
What do you guys think? What's your favorite part of this Office Makeover?


If you liked the post, please share it on your social networks. Thanks for your support!
Compartir en Topic

Wednesday, January 29, 2014

DIY: Chain embellished blazer (Rachel Roy inspired)


Hi everyone!
I'm sure this DIY will seem familiar for some of you guys. I finally made my own Rachel Roy inspired embellished blazer!! I came across this perfect blazer at Zara a few weeks ago, when I went shopping sales. The moment I saw this jacket on the rack, I instantly envisioned the result of this project. I loved the color and the lapels, it was exactly what I was looking for.

However, the process hasn't been a bed of roses... To be honest, it took much longer than I expected and my fingertips are aching a little bit now. But once I started, I simply had to finish... If I had to start over now, I'd probably apply the chains on a smaller surfaces. Anyway, I think it's worth it. I looove the way my blazer looks now. What do you guys think?


Blazer: Zara

How would you guys customize a blazer? On which kind of garments would you apply chains? Hope you guys liked it!!

Kisses!! <3 <3 
Sylvia

Share this post on your social media
Compartir en Topic

Thursday, November 21, 2013

Dare to wear: customized jeans

After a hurricane comes a rainbow...  Definitely, Katy Perry's lyrics are an immeasurable source of wisdom. There's no doubt about it.

Yesterday morning, after a week of depressing rain, the sun came back to Barcelona. It might sound whimsical or weird, but the weather totally changes my mood. For me, the worst thing about those grey days is that it is impossible to record new DIY videos. They look so dull and sad, and I don't like the effect of artificial lightning on the camera. So when I saw that beautiful day, I went out to take pictures of this outfit, featuring two of my latest DIYs. I wore my customized jeans with a sweatshirt from Maje, a shirt from Asos and high heels. What do you guys think?

Sweatshirt: Maje / Shirt: Asos / Jeans: Customized Levis Curve ID / Football ball bag: DIY / Shoes: Calvin Klein

Share this on your social media
Compartir en Topic

Tuesday, November 19, 2013

International giveaway!! win a custom made skirt

Lee esto en español
Hi everyone!

It's been so long since the last time I updated my English blog. I haven't had much time to translate my posts and my videos, sorry about that! I'll try to translate all those posts ASAP. In the future I'll also try to publish the English translations at the same time as my Spanish posts.

And now, let's go to the good news!! A few days ago, my Youtube channel reached the amazing figure of 10.000 subscribers. Isn't that amazing? I'm so excited about this and I want to thank you guys for your endless support and encouragement. Otherwise my blog wouldn't be what it is today. So... to celebrate this incredible achievement, I'm going to give away one of my favorite DIYs: my newspaper print skirt. The winner will get a made-to-measure skirt. What do you guys think?

What I'm saying in the video is that if you want to participate in this giveaway, you have to follow three simple steps:

1. Like my Facebook Fan Page
2. Click on Subscribe on my Youtube channel
3. Write an e-mail to sorteo@daretodiy.com and tell me your nicknames on FB and Twitter. The deadline is December 5th 2013.
4. You're done!!

Hope you guys like this!! I would love to see you guys wearing my DIY clothes :)


Share this on your social media
Compartir en Topic
Related Posts Plugin for WordPress, Blogger...